Well Cementing Step by Step: From Slurry to Rock
Lesson Summary
Why we cement, how to design the slurry, stages of the operation from cleaning to displacement, and how to evaluate cement quality.
This lesson is part of the Drilling & Completion track, with a duration of 30:01 minutes. Watch the video first, then review the key points and test your understanding with the questions below.
Key Points
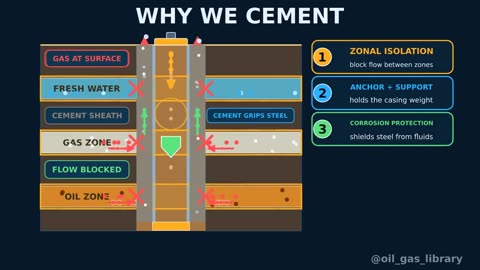
- 1Zonal isolation, Casing support, and corrosion protection.
- 2The Spacer separates mud from the cement slurry.
- 3Displacement using top and bottom Plugs.
- 4Quality evaluation using cement logs.
Written Lesson
What is Well Cementing and Why Do We Do It?
Primary Cementing (Primary Cementing) is the process of pumping a cement slurry into the annulus between the Casing and the wellbore wall, then allowing it to set. The process sounds simple, but it determines the entire life of the well, as poor cement is not easily fixed once it hardens behind the Casing.
Cementing has four main functions: zonal isolation to prevent gas or water migration between layers, mechanically supporting and anchoring the Casing, protecting it from corrosive formation fluids, and sealing flow paths that could reach the surface.
The Slurry and Its Properties
The slurry is a mixture of Portland cement, water, and additives, designed for each well based on depth, temperature, pressure, and formation characteristics. Its key properties include:
- Density: Adjusted to stay between pore pressure and fracture pressure, just like drilling mud.
- Thickening Time (Thickening Time): The duration the slurry remains pumpable; it must exceed the total operation time with a safety margin.
- Rheology (Rheology): determines how the slurry moves in the annulus and displaces the mud.
- Fluid Loss (Fluid Loss): The amount of water the slurry loses to the formation; excessive loss ruins the cement quality.
- Compressive Strength (Compressive Strength): The strength the cement reaches after setting.
To adjust these properties, we add chemicals: accelerators (like calcium chloride) to shorten setting time in shallow cold wells, retarders (Retarders) to extend it in deep hot wells, dispersants to lower viscosity, fluid loss additives, weighting agents like barite and hematite, and extenders to produce a lighter slurry.
Operation Steps
The operation follows a precise sequence; any deviation can leave mud channels inside the cement:
- Casing Preparation: The Casing is run with its Shoe and Float Collar, then mud is circulated to clean the hole and condition the mud properties.
- Pressure Test: We pressure test the pumping lines before starting the cement job.
- The Spacer: A spacer fluid pumped first to displace mud and clean the walls, preventing mud from contaminating the cement.
- Lead Slurry (Lead): A lighter, cheaper slurry that fills the upper part of the annulus.
- Tail Slurry (Tail): A stronger, heavier slurry placed around the shoe and the production zone.
- Top Plug (Top Plug): Released after the last of the slurry to separate it from the displacement fluid.
- Displacement: We pump displacement fluid (usually mud or water) behind the plug, which pushes the cement through the shoe and up into the annulus.
- Bump the Plug (Bump the Plug): The plug seats on the float collar, causing a sudden pressure spike, signaling the end of displacement.
- Waiting on Cement (WOC): We wait for the cement to set and reach the required strength before any further operations.
- Evaluation: We verify quality with logs such as CBL and VDL.
Volume example: 9-5/8 inch casing with 8.681 inch ID, capacity = (8.681)² ÷ 1029.4 ≈ 0.0732 bbl/ft. If the float collar is at 9,900 ft, the required displacement volume to bump the plug ≈ 9,900 × 0.0732 ≈ 725 bbl. Monitoring displacement volume and bump pressure confirms the cement reached its destination.
How Do We Know the Cement is Good?
We evaluate cement using sonic logs inside the Casing. The CBL log measures the signal amplitude reflected from the casing; the better the cement bond to the casing, the lower the amplitude. Similarly, the VDL provides a picture of the bond to the formation. These logs are not read in isolation but alongside the job history and pumping reports.
If a defect appears, such as a channel or void, remedial cementing is performed: a Squeeze to inject slurry through casing perforations into the defective area, or a Plug to place a cement plug inside the well for zonal isolation or abandonment.
Common Errors
- Leaving mud without sufficient circulation, causing it to remain on the wall and block the cement bond.
- Neglecting the Spacer or reducing its volume, leading to mud-cement contamination.
- Exceeding the thickening time due to operational delays, causing the slurry to set before pumping is finished.
- Failing to monitor Returns during displacement, which is an early sign of losses.
Notice
The numbers mentioned are educational and vary from well to well. Always design your operation according to your company's approved program and API standards.
Test Yourself
Lesson Glossary
Cemented pipe strings that protect the borehole wall and isolate formations.
Mix of cement, water, and additives pumped into the well.